

Start another activity
After completing the previous lesson, you have an app that shows an activity (a single screen) with a text field and a button. In this lesson, you’ll add some code to
MainActivity that starts a new activity to display the message when the user taps Send.Start another activity
After completing the previous lesson, you have an app that shows an activity (a single screen) with a text field and a button. In this lesson, you’ll add some code to
MainActivity that starts a new activity to display the message when the user taps Send.Note: This lesson expects that you are using Android Studio 3.0 or higher.
Respond to the send button
Add a method to the
MainActivity class that's called by the button as follows:- In the file app > java > com.example.myfirstapp > MainActivity, add the
sendMessage()method stub as shown below:
class MainActivity : AppCompatActivity() {
    override fun onCreate(savedInstanceState: Bundle?) {
        super.onCreate(savedInstanceState)
        setContentView(R.layout.activity_main)
    }

    /** Called when the user taps the Send button */
    fun sendMessage(view: View) {
        // Do something in response to button
    }
}
You may see an error because Android Studio cannot resolve theViewclass used as the method argument. So click to place your cursor on theViewdeclaration, and then perform a Quick Fix by pressing Alt + Enter (or Option + Enter on Mac). (If a menu appears, select Import class.) - Now return to the activity_main.xml file to call this method from the button:
- Click to select the button in the Layout Editor.
- In the Attributes window, locate the onClick property and select sendMessage [MainActivity] from the drop-down list.
- Now when the button is tapped, the system calls the
sendMessage()method.Take note of the details in this method that are required in order for the system to recognize it as compatible with theandroid:onClickattribute. Specifically, the method has the following characteristics:- Public access
- A void or, in Kotlin, an implicit unit return value
- A
Viewas the only parameter (it is theViewobject that was clicked)
Next, you’ll fill in this method to read the contents of the text field and deliver that text to another activity.Build an Intent
AnIntentis an object that provides runtime binding between separate components, such as two activities. TheIntentrepresents an app’s "intent to do something." You can use intents for a wide variety of tasks, but in this lesson, your intent starts another activity.InMainActivity, add theEXTRA_MESSAGEconstant and thesendMessage()code, as shown here:
const val EXTRA_MESSAGE = "com.example.myfirstapp.MESSAGE"
class MainActivity : AppCompatActivity() {
    override fun onCreate(savedInstanceState: Bundle?) {
        super.onCreate(savedInstanceState)
        setContentView(R.layout.activity_main)
    }

    /** Called when the user taps the Send button */
    fun sendMessage(view: View) {
        val editText = findViewById<EditText>(R.id.editText)
        val message = editText.text.toString()
        val intent = Intent(this, DisplayMessageActivity::class.java).apply {
            putExtra(EXTRA_MESSAGE, message)
        }
        startActivity(intent)
    }
}
Android Studio again encounters Cannot resolve symbol errors, so press Alt + Enter (or Option + Return on Mac). Your imports should end up as the following:
import android.content.Intent
import android.support.v7.app.AppCompatActivity
import android.os.Bundle
import android.view.View
import android.widget.EditText
An error remains forDisplayMessageActivity, but that's okay; you'll fix that in the next section.Here's what's going on insendMessage():- The
Intentconstructor takes two parameters: - The
putExtra()method adds theEditText's value to the intent. AnIntentcan carry data types as key-value pairs called extras. Your key is a public constantEXTRA_MESSAGEbecause the next activity uses the key to retrieve the text value. It's a good practice to define keys for intent extras using your app's package name as a prefix. This ensures the keys are unique, in case your app interacts with other apps. - The
startActivity()method starts an instance of theDisplayMessageActivityspecified by theIntent. Now you need to create that class.
The Navigation Architecture Component, currently in alpha, allows you to use the Navigation Editor to associate one activity with another. Once the relationship is made, you can use the API to start the second activity when the user triggers the associated action (i.e. clicking a button). To learn more, see The Navigation Architecture Component.Create the second activity
- In the Project window, right-click the app folder and select New > Activity > Empty Activity.
- In the Configure Activity window, enter "DisplayMessageActivity" for Activity Name and click Finish (leave all other properties set to the defaults).
Android Studio automatically does three things:- Creates the
DisplayMessageActivityfile. - Creates the corresponding
activity_display_message.xmllayout file. - Adds the required
<activity>element inAndroidManifest.xml.
If you run the app and tap the button on the first activity, the second activity starts but is empty. This is because the second activity uses the empty layout provided by the template.Add a text view
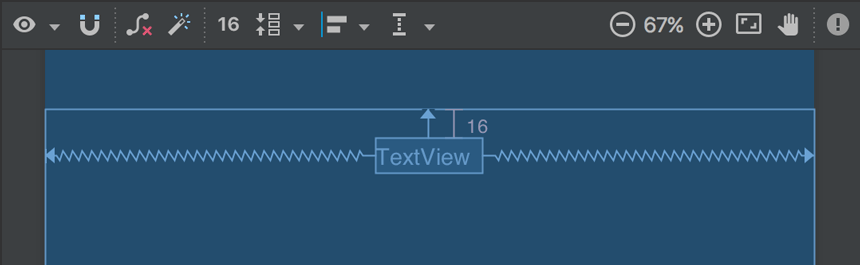 Figure 1. The text view centered at the top of the layoutThe new activity includes a blank layout file, so now you'll add a text view where the message will appear.
- Open the file app > res > layout > activity_display_message.xml.
- Click Turn On Autoconnect
 in the toolbar (it should then be enabled, as shown in figure 1).
 - In the Palette window, click Text and then drag a TextView into the layout—drop it near the top-center of the layout so that it snaps to the vertical line that appears. Autoconnect adds left and right constraints to place the view in the horizontal center.
- Create one more constraint from the top of the text view to the top of the layout, so it appears as shown in figure 1.
Optionally, make some adjustments to the text style by expanding textAppearance in the Attributes window and change attributes such as textSize and textColor.Display the message
Now you will modify the second activity to display the message that was passed by the first activity.- In
DisplayMessageActivity, add the following code to theonCreate()method:
override fun onCreate(savedInstanceState: Bundle?) {
    super.onCreate(savedInstanceState)
    setContentView(R.layout.activity_display_message)

    // Get the Intent that started this activity and extract the string
    val message = intent.getStringExtra(EXTRA_MESSAGE)

    // Capture the layout's TextView and set the string as its text
    val textView = findViewById<TextView>(R.id.textView).apply {
        text = message
    }
} - Press Alt + Enter (or Option + Return on Mac) to import missing classes. Your imports should end up as the following:
import android.content.Intent
import android.support.v7.app.AppCompatActivity
import android.os.Bundle
import android.widget.TextView
Add up navigation
Each screen in your app that is not the main entry point (all screens that are not the "home" screen) should provide navigation so the user can return to the logical parent screen in the app hierarchy by tapping the Up button in the app bar.All you need to do is declare which activity is the logical parent in theAndroidManifest.xmlfile. So open the file at app > manifests > AndroidManifest.xml, locate the<activity>tag forDisplayMessageActivityand replace it with the following:
<activity android:name=".DisplayMessageActivity"
          android:parentActivityName=".MainActivity">
    <!-- The meta-data tag is required if you support API level 15 and lower -->
    <meta-data
        android:name="android.support.PARENT_ACTIVITY"
        android:value=".MainActivity" />
</activity>
The Android system now automatically adds the Up button in the app bar.Run the app
Now run the app again by clicking Apply Changes in the toolbar. When it opens, type a message in the text field, and tap Send to see the message appear in the second activity.
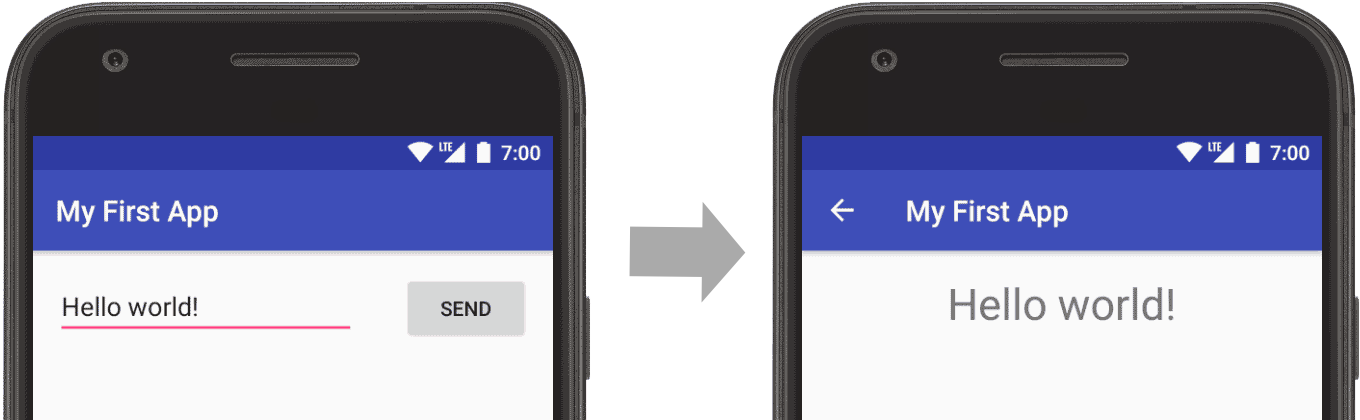 Figure 2. Screenshots of both activitiesThat's it, you've built your first Android app!To continue learning the basics about Android app development, follow the other links provided on this tutorial's front page.


No comments:
Post a Comment